by admin | Jul 9, 2012 | Home Maintenance, Home Repair, Plumbing
Compliments of www.cameronpaine.com
http://www.kitecsettlement.com/kitecphotos.cfm
http://www.kitecsettlement.com/index.cfm
http://www.kitecsettlement.com/completingform.cfm
Source: The Windsor Star – June 29, 2011
A family rocked by a $13,000 plumbing bill is warning people to beware of potentially faulty plumbing lurking behind the walls of homes built or renovated in the last two decades.
Frank and Annette Cappellino built their dream home in LaSalle, near Windsor, Ont., about 10 years ago. Last fall, the Cappellinos came home to a flood in their basement.
“Water was just spewing out like a waterfall,” said Frank Cappellino. “A pipe had totally burst.”
Cappellino said after a home inspection by a plumbing distributor and a representative of the Canadian manufacturer IPEX, the rep told him the cause of the leak was defective pipes branded under the name Kitec — pipes that were running throughout the house.
“He said he had to take a part of it back to his company to get it tested but indicated that if it was his pipe, basically he would have it replaced,” Cappellino said.
The Cappellinos contacted the company to find out the testing results, but said they were told they couldn’t have a copy of the report because a class action lawsuit was underway. IPEX provided the Cappellinos with the name of the Windsor law firm leading the suit. Cappellino said they joined the legal fight shortly thereafter.
On Tuesday, lawyers for IPEX Inc. and IPEX USA LLC announced they had reached an agreement in the lawsuit, and that a $125-million US settlement fund has been proposed.
Product used extensively
Another family, whose home was built the same year as the Cappellinos, also ended up replacing all the pipes in their home at their own expense, after finding issues with their Kitec pipes, manufactured by IPEX.
Plumbers in the region have been getting more and more calls about the Kitec brand of pipe, also known as PEX.
According to Kyle Fowler, co-owner of Fowler Plumbing in Windsor, if you built or remodelled your home in the last decade or so, it’s likely Kitec pipes were used. He said he gets at least one call a week that turns out to be Kitec-related, and he said the plumbing system was used in most of the newer subdivisions.
“I even have some in my house,” Fowler said. “Because we didn’t know. We thought it was good.”
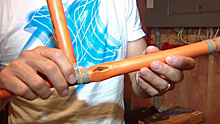
 Cappellino shows the Kitec hot water pipe that burst last fall. Karen Brady/CBCThe Kitec plumbing system consists of blue and orange flexible piping and brass fittings, used to carry cold and hot water through a home. Kitec products were also used in radiant heating systems.
The pipes were made from polyethylene and a thin inner layer of aluminum, and plumbers considered them to be an excellent product because they were cheaper than copper and their flexible nature made the product easy to install.
The class action lawsuits in Canada and the U.S. allege that the product was negligently manufactured, which caused the pipes to disintegrate prematurely.
The pipes were sold from 1995 to 2007, and potential claims have been filed by residents of Alberta, B.C., Ontario, Quebec, and the Maritimes, according to Dave Robins, the lawyer representing Canadians in the class action lawsuit.
Kitec was sold under various brand names, including Kitec, PlumbBetter, IPEX, AQUA, WARMRITE, Kitec XPA, AmbioComfort, XPA, KERR Controls and Plomberie Amelioree.
Fittings recalled in 2005
In 2005, IPEX recalled brass compression fittings from Canadian and U.S. distributors. The Canadian statement of claim alleged the fittings were faulty causing pipes to disintegrate. Plumbers say the brass reacted with the chemical composition of the pipe, causing it to corrode, or “dezincify,” and fail.
Tim Tiegs, a faculty co-ordinator for the skilled trades programs at St. Clair College in Windsor, said the only way for homeowners to make sure the allegedly faulty pipes don’t turn into costly water damage claims is to have them replaced.
“Most of what I’ve read and heard is the fact that if you have it, you need to replace it … that it’s gone from whether or not it will fail, to when it will fail,” said Tiegs.
Fowler said replacing pipes usually means cutting open walls — a costly repair.
“It’s the only way to absolutely guarantee that you’re not going to have any trouble, because you can fix leaks but that’s just the start. It will go through the whole house eventually,” he said.
Tiegs said at the very least, homeowners with Kitec plumbing systems should have a trusted plumber check out the condition of the pipes and fittings.
Property owners and those looking to buy a home should also be aware of the possibility of problems insuring homes if the plumbing is found to be faulty, he said.
Settlement agreement reached
Nicholas Rosati of Windsor and Anthony Bellissimo of Toronto initiated the Canadian class action lawsuit, which was certified in February. There are two suits in Canada — one for Quebec and one covering the rest of the country. A multi-district class action suit was initiated against IPEX in the U.S. as well.
A settlement agreement was reached Tuesday.
A statement issued jointly by the lawyers of the Canadian and American plaintiffs said:
“IPEX denies these allegations and asserts that the Kitec system is not defective and that the vast majority of the systems will last throughout the warranty period [30 years]. The parties have agreed to the settlement to avoid the expense, inconvenience and distraction of further protracted litigation and to fully resolve this matter.”
IPEX Inc., which has offices in Toronto and Verdun, Que., refused to comment on the allegations about the company’s products or the lawsuit when contacted by CBC News.
Canadian lawyer Robins said the settlement fund will be open to claims for eight years “because the prospect of the product failing could materialize over some time.”
The settlement agreement still has to be approved in court, he said. None of the allegations against IPEX have been proven in court.
by admin | Jan 17, 2012 | Home Improvement, Home Repair, Saftey
Carbon Monoxide
The presence of carbon monoxide (CO) in our homes is dangerous. So, how can you protect your family from carbon monoxide? How do you choose the right CO detector for your home? The first step is to make sure that carbon monoxide never enters your home. The second step is to install at least one CO detector in your home.
This About Your House answers often-asked questions about carbon monoxide to help you make the right decision to make your home safe.
What Is Carbon Monoxide?
Carbon monoxide (CO) is a colourless and odourless gas. Because you can’t see, taste or smell it, it can affect you or your family before you even know it’s there. Even at low levels of exposure, carbon monoxide can cause serious health problems. CO is harmful because it will rapidly accumulate in the blood, depleting the ability of blood to carry oxygen.1
Where Does Carbon Monoxide Come From?
Carbon monoxide is a common byproduct of the combustion (burning) of fossil fuels. Most fuel-burning equipment (natural gas, propane and oil), if properly installed and maintained, produces little CO. The byproducts of combustion are usually safely vented to the outside. However, if anything disrupts the venting process (such as a bird’s nest in the chimney) or results in a shortage of oxygen to the burner, CO production can quickly rise to dangerous levels.
The burning of wood, kerosene, coal and charcoal produces CO. Gasoline engines produce CO. CO production is at a maximum during the startup of a cold engine. Starting, then idling, your car or gas mower in the garage can be dangerous. The fumes that contain CO can enter a home through connecting walls or doorways and can quickly rise to dangerous levels.
How Can I Eliminate Sources of Carbon Monoxide in My Home?
The most important step you can take to eliminate the possibility of CO poisoning is to ensure that CO never has an opportunity to enter your home. This is your first line of defence. Review this list to minimize the risk of CO in your home.
- Have a qualified technician inspect and clean fuel-burning appliances yearly, before the cold weather sets in, to ensure they are in good working order.
- Have a qualified technician inspect chimneys and vents yearly for cracks, blockages (e.g., bird’s nests, twigs, old mortar), corrosion or holes.
- Check fireplaces for closed or blocked flues.
- Check with a qualified technician before enclosing heating and hot water equipment in a smaller room, to ensure there is adequate air for proper combustion.
- If you have a powerful kitchen exhaust fan or downdraft cooktop, have a qualified technician check that its operation does not pull fumes back down the chimney.
- Never use propane or natural gas stove tops or ovens to heat your home.
- Never start a vehicle in a closed garage; open the garage doors first. Pull the car out immediately onto the driveway, then close the garage door to prevent exhaust fumes from being drawn into the house.
- Do not use a remote automobile starter when the car is in the garage; even if the garage doors are open.
- Never operate propane, natural gas or charcoal barbecue grills indoors or in an attached garage.
- Avoid the use of a kerosene space heater indoors or in a garage. If its use is unavoidable provide combustion air by opening a window while operating. Refuel outside after the unit has cooled.
- Never run a lawnmower, snowblower, or any gasoline-powered tool such as a whipper snipper or pressure washer inside a garage or house.
- The use of fossil fuels for refrigeration, cooking, heat, and light inside tents, trailers, and motorhomes can be very dangerous. Be sure that all equipment is properly vented to the outside and use electric or battery-powered equipment where possible.
- Regularly clean the clothes dryer ductwork and outside vent cover for blockages such as lint, snow, or overgrown outdoor plants.
- Reduce or eliminate the use of fondue heaters indoors.
- If you live close to a road with heavy traffic, outdoor carbon monoxide levels can affect your indoor air quality, especially during rush hour. Such levels should not set off a CO alarm, but slightly elevated CO levels might be observable on some types of CO detectors with a digital display.
Carbon Monoxide Detectors
Are They Really Necessary?
If you take the actions above, you greatly reduce your risk of CO poisoning. But unanticipated dangerous incidents may still occur despite your best efforts to avoid CO. The installation of at least one CO detector in your home is a good safety precaution and in some municipalities, it is the law. A detector might be your second line of defence, but it is necessary. You should have one in your home today.
How Do CO Detectors Work?
There are three basic types of CO sensors — metal oxide, biomimetic and electrochemical. Note that while there may be performance differences between these technologies, all detectors are tested and approved for their operation. The retail cost of a detector will generally relate to the number of features included and its warranty conditions.
Metal-oxide-semi-conductor (MOS)
This is the original technology for detecting CO. Heated tin oxide reacts with CO to determine the levels of the toxic gas. There is no need to remember to check batteries as units must be connected to house power. Models that offer up to 20 hours of battery backup are available.
Biomimetic
Biomimetic detectors have gel-coated discs that darken in the presence of CO and the colour change sounds an alarm. This technology is less expensive and can be battery operated.
Electrochemical
In this type of detector, a chemical reaction with CO creates an electrical current that sets off an alarm. Electrochemical detectors are highly sensitive and offer accurate readings at all CO levels. Most units come with a continuous digital readout and a memory feature that allows you to check past CO levels. This technology offers a fast reset time. Most units sound an alert when the sensor needs to be replaced.
What Features Should I Look for When Purchasing a CO Detector?
Most CO detectors are designed to give an alarm when CO levels reach a high level in a short time. However, health agencies advise that long-term, low-level exposure is also of concern, especially for the unborn and young children, the elderly and those with a history of heart or respiratory problems.1 Detectors that can display both high and low levels are more expensive but they do provide greater accuracy and more information.
Here are some features to consider when purchasing a CO detector:
- Look for a detector that is listed with the Canadian Standards Association (CSA) standard. The logos of the testing agency will be on the product.
- Choose a detector with a memory if you want to monitor long-term, low-level exposure and short-term, high-level exposure. Even though product standards do not allow manufacturers to display low levels of CO, these units monitor and store this information. Peak levels, no matter what the level of concentration, can be viewed by pressing a button.
- Battery-operated units allow detector placement in the most convenient location. However, any battery-operated device requires the user’s diligence in replacing worn-out batteries.
- Do not connect plug-in units to an electrical outlet that is controlled by a wall switch.
- No detectors will operate properly forever. Replace them at least every five years, unless the manufacturer specifies a shorter or longer life. Eventually, manufacturers may be required to print expiry dates on their CO detectors. This will ensure that you are purchasing an up-to-date product with a full sensor life.
Detector Sensitivity Issues
The standards organizations of Canada (CSA) and the United States (Underwriters Laboratories or UL) have coordinated the writing of CO standards and product testing. The standards as of 2010 prohibit showing CO levels of less than 30 ppm on digital displays. The most recent standards also require the alarm to sound at higher levels of CO than with previous editions of the standard. The reasoning behind these changes is to reduce calls to fire stations, utilities and emergency response teams when the levels of CO are not life threatening. This change will also reduce the number of calls to these agencies due to detector inaccuracy or the presence of other gases. Consequently, new alarms will not sound at CO concentrations up to 70 ppm. Note that these concentrations are significantly in excess of the Canadian health guidelines.
Detectors with a digital display and a “history” option can provide the true CO concentrations in a house. A low-level display would be useful for people with existing respiratory problems or for those who like to spot evolving problems, rather than having to wait for the situation to become serious. Low-level CO detection products are becoming commercially available. They will not be certified to CSA or UL standards, as these standards currently prohibit low-level displays.
Where Do I Put a CO Detector?
Most manufacturers specify where you should locate their CO detector. In general, the best place to put the detector is where you will hear it while sleeping. CO is roughly the same weight as air and distributes evenly throughout a room, so a detector can be placed at any height in any location, as long as its alarm can be heard. Additional units could be installed in several other locations around the home, such as a child’s bedroom; check the following list before installing.
To avoid both damage to the unit and to reduce false alarms, do not install CO detectors:
- in unheated basements, attics or garages
- in areas of high humidity
- where they will be exposed to chemical solvents or cleaners, including hair spray, deodorant sprays, etc.
- near vents, flues or chimneys
- within 2 m (6 ft.) of heating and cooking appliances
- near forced- or unforced-air ventilation openings
- within 2 m (6 ft.) of corners or areas where natural air circulation is low
- where they can be damaged, such as an outlet in a high traffic area
- where directly exposed to the weather.
Testing Your CO Detector
Most CO detectors have a test button that should be pressed once a week to confirm that the device is in operation. Detectors with displays can be tested with a known source of CO such as smoke from an incense stick. Hold the CO source about 20 – 25 cm (8 – 10 in.) away and watch the digital display respond to the presence of even a small amount of CO, but an alarm will most likely not sound with this test.
There are CO detector test kits available, where CO detectors are sold, that provide a vial containing a high level of CO (1,000 ppm) and a plastic tent to house the unit during the test. This test only proves that your detector will sound an alarm with a very high level of CO.
What Do I Do if I Hear the Carbon Monoxide Detector Alarm?
Do not ignore the CO detector’s alarm if it sounds. Treat each alarm as serious and respond accordingly. CO detectors are designed to sound an alarm before a healthy adult would feel any symptoms. Infants, the elderly and those with respiratory and heart conditions are at particular risk and may react to even low levels of CO poisoning.1
Response to an Obvious Source of CO
If your detector sounds an alarm and you have an obvious source of CO, such as an unvented kerosene heater:
- evacuate the house, including pets and do a head count
- if anyone is suffering from flu-like symptoms, call 911
- remove or turn off the source
- ventilate the house
- reset the alarm
- do not re-occupy the house until the alarm ceases
- take steps to avoid this situation in the future.
Response to an Unknown Source of CO
If your CO detector is sounding an alarm and there is no obvious source of CO:
- evacuate the house, including pets and do a head count
- if anyone has flu-like symptoms, call 911; if there are no health problems, call your gas utility, heating contractor or the fire department to have your house tested
- if you live in a single-family home: do not ventilate your home, turn off fuel-burning appliances or reset your CO detector prior to someone testing your home. Many CO alarm calls have been classified as “false alarms” because the homeowner had ventilated the home and turned off the equipment before firefighters or technicians could measure the CO levels and find the source
- if you live in a duplex, row house, apartment, or otherwise attached house, do ventilate the house and turn off fuel-burning appliances. In this case, the safety of your neighbours is more important than trying to find the CO source
- have a qualified service technician inspect and repair all fuel-burning appliances, if they are identified as being the CO source
- do not re-occupy the house unless those who tested the house inform you that the danger is over.
Symptoms of Carbon Monoxide Poisoning2
Be sure that all members of your family know the symptoms of CO poisoning:
Mild Exposure
Flu-like symptoms such as headache, running nose, sore eyes, etc.
Medium Exposure
Drowsiness, dizziness, vomiting. The sense of disorientation and confusion may make it difficult for some victims to make rational decisions like leaving the home or calling for assistance.
Extreme Exposure
Unconsciousness, brain damage, death.
Continued Low-level Exposure to CO
While this may be not lead to observable symptoms, you should still avoid such exposure.
Table 1 — Carbon monoxide concentrations and their effects
| CO concentration in parts per million (ppm) |
Effects |
| 0 – 2 |
Normal conditions in and outside Canadian houses. |
| 10 |
Recommended exposure limit over a 24-hour period.3 |
| 25 |
Recommended exposure limit over a 1-hour period.3 |
| 30 |
CO detectors are not allowed to sound alarm unless this concentration is maintained for more than 30 days.2 |
| 70 |
CO detectors must sound alarm within 1 to 4 hours.2 |
| 150 |
CO detectors must sound alarm within 10 to 50 minutes.2 |
| 200 |
Slight headache, fatigue, dizziness and nausea after 2 to 3 hours. CO detector alarm must sound within 35 minutes.4 |
| 400 |
CO detectors must sound alarm within 4 to 15 minutes.2 |
| 800 |
Dizziness, nausea and convulsions within 45 minutes, death within 2 to 3 hours.4 |
| 1,600 |
Death within 1 hour.4 |
| 13,000 |
Danger of death after 1 to 3 minutes.4 |
1 Canada. Health Canada,
Exposure Guidelines for Residential Indoor Air Quality (Ottawa: Ministry of Supply and Services Canada, 1989).
2 Canadian Standards Association, CAN/CSA 6.19-01: Residential Carbon Monoxide Alarming Devices (Canada: Canadian Standards Association, 2001).
4 T. H. Greiner, Carbon Monoxide Poisoning (AEN-172) (Ames: Iowa State University of Science and Technology, 1997).
Last revised: 2011
by admin | Jan 4, 2012 | Blog, Home Improvement, Home Maintenance, Home Repair, Interior design
Painting: Walls, Ceilings and Floors
Compliments of www.cameronpaine.com
Painting is not the chore it used to be. A professional look is now easier to achieve. Whatever your project, talk to the paint experts where you purchase your paint. They are a valuable resource.
If you are having a hard time visualizing the colour, inexpensive computer software programs can allow you to try out different colours. Or, there may be a decorating service where you buy your paint.
Selecting paints
There are two main types of paint depending on the thinners and binders used; water-based (or latex) and oil-based (or alkyd).
Water-based paints use water as a thinner. They are often called latex paints even though they don’t use real latex, since rubber is not used as a binder any more. Today synthetic latexes are used, most commonly acrylic or polyvinyl acetate. Paints with a high acrylic content tend to have a tougher skin and can perform almost as well as oil-based paints. Latex paints can be easily cleaned up with soap and water.
Oil-based paints use a solvent thinner. Despite the name, oil-based paints are usually not made with oil. Instead, most use polyester resins, called alkyds. Although alkyds may be more durable and achieve a higher gloss finish, they are usually a less healthy choice than latex. Alkyd paints require mineral spirits for cleaning up.
Because paints are applied wet, and because they cover such a large area, paints can create a significant health problem during a renovation project. The problem is mainly caused by alkyd or solvent-based paints. They give off a number of volatile organic compounds (VOCs) as the solvent evaporates after painting.
These VOCs can be a strong irritant and can add to air pollution. Once the paint has completely dried and formed a tough skin, the emission levels drop. However, some paints can emit odours at low levels for a long time.
Exposure to VOCs varies from person to person. Effects include coughing, headaches, dizziness, or more serious conditions. It is especially important for respiratory sufferers, those with allergies, asthma, and households with young children or pregnant women to avoid paints with VOCs.
Comparing the VOCs of one paint to another is not an easy task. Material Safety Data Sheets (MSDS) are helpful, but manufacturers don’t have to list components which make up one per cent or less of their product’s weight. This means that some toxic components may not show up on the MSDS. The only sure way to know what the paint contains is by asking the manufacturer to list trace compounds.
There are some paints on the market that are solvent and VOC free. Look for the key words: Low VOC, or better yet. No VOC.
Painting myth
Contrary to popular belief, you can paint over oil or alkyd paint with latex paint.
To do so the walls should be cleaned, painted with a super adherent acrylic primer, then latex paint can be applied.To test if the paint on the walls is oil or alkyd some stores carry inexpensive test kits, or you can use methyl hydrate (gas line anti-freeze) or non acetone based nail polish remover.
Apply a small quantity of one of these products to a pad and rub vigorously on the painted surface. If the surface remains shiny it is oil/alkyd; if the paint is stripped it is latex.
Types of paint
It can be confusing when selecting the sheen of paint you want since the term used for the sheen varies by manufacturer.
Low-sheen (low-gloss) paints have none to little observable sheen. The amount varies slightly by manufacturer. Low-sheen paints can be called: flat, matt, eggshell, satin and velvet.
Higher sheen paints are semi-gloss, gloss and enamel. They have the most visible shine to them.
Low-sheen paints can be washed, but with care, higher sheen paints are the most washable and have the most durable finishes.
Most people select semi-gloss or high-gloss paints for rooms with high moisture levels such as kitchens and bathrooms, and high traffic areas such as main stairways and halls. Most people prefer to use semi-gloss or high-gloss paint on windows, trim and doors.
Bedrooms, dining and living rooms are more commonly painted with lower sheen paints.
Years ago, enamel meant oil-based paints.Today the term enamel can also mean durable latex paint.
Sealers are primarily used on new wood or masonry surfaces. They seal the surface of the material, forming a base coat which keeps the topcoat from being absorbed unevenly. They can be used to encapsulate materials to seal in gases thus preventing them from offgassing.
Primers are used to make the substrate more uniform, and to create a tight bond between the topcoat and the surface to be painted.
Cementious or masonry paints are used on concrete walls and floors.
Ceiling paints are designed not to drip.
Melamine paints are used for cabinets and shelves, and are very durable and washable.
Choosing paint by the brand is not enough. Many brand manufacturers make higher and lower quality lines of paint. As you move up in quality so does the price. Each grade is usually a few dollars more expensive than the previous grade. Avoid mixing the brands by using the primer of one brand with the finish paint of another. Paint will adhere better if you use the same brand for both applications.
If you buy all the paint you need at one time you have a better chance of getting a uniform colour.
Brushes and other tools
Ensure the rollers and paint brushes you buy are rated for the type of paint you are using. Better quality brushes help ensure that the paint strokes are less visible.
Estimating how much paint you will need
Measure the height and width of each wall to be painted then multiply to obtain the square footage.
For rooms with lots of windows and doors deduct the square footage of the windows and doors.
A 4-litre (1 gallon) pail of paint will usually cover 37 square metres (400 square feet).
When calculating how much paint to buy, check how well it is expected to cover the surface to be painted. This is called hiding quality. Painting over very dark colours may require using primer as the first coat or more coats of paint.
Having the primer tinted the same colour as the finish coat can provide better hiding qualities.
Latex based paints should not be stored for extended periods of time as they can go bad. When buying paint look for the most current date of manufacture on the container.
Getting ready
Preparation is the most important and most time consuming part of painting. Usually at least 80 per cent of the time spent on a painting project is spent getting ready and cleaning up.
- Assess the surface that requires painting for needed repairs. Popped nails in the drywall or wallboard can be corrected by screwing a new screw into the stud either two inches above or below the popped nail. The popped nail can then be nailed in and the holes filled with wallboard or spackling compound. Make the patch on the hole as smooth as possible to minimize sanding.Wear a mask while sanding using no. 100 or no. 120 grit sandpaper if using wall repair compound and no. 220 grit for spackling compound.
- For larger holes the compound may need to be applied in layers. Each layer should dry before the next one is applied. To help the compound bond to the drywall, apply a layer of glass fibre (mesh) tape. It comes in a roll similar to cellophane tape.
- Vacuum the whole room and damp mop the floor if possible. Wash the surface to be painted with mild detergent and water. If there are grease marks on the walls, or if someone in the household smokes, you may first need to clean with TSP (tri-sodium phosphate). If using TSP, be aware that it is not a benign product, and should only be used while wearing rubber gloves and eye protection. Rinse well with clean water.
- For very textured walls or ceilings, vacuuming may be the only pre-cleaning option.
Painting new drywall or wood
Previously unpainted drywall, or plaster must be primed. Previously unpainted wood can be stained, painted or urethaned.
Special considerations
Lead in paint
Lead in interior paint was taken off the market in 1979. Paint in houses or apartments built before that date almost certainly contain small amounts of lead paint.
Exposure to large amounts of lead can cause serious illness. Infants and children are especially vulnerable to lead. However, lead paint is not generally a problem if it is not flaking, peeling or blistering.To check if the walls contain lead, you can obtain a lead paint test kit at most major hardware and some health food stores.
Sanding or heat stripping lead paint requires safety precautions, including protective clothing, a mask, goggles and gloves. Lead paint in the form of sanded particles are a health hazard.
Pregnant women and children should never be exposed to dust or fumes caused during lead paint removal.
For further information on lead, order the free booklet Lead In Your Home from CMHC.
Covering water stains, marks and knot holes
Water stains on ceilings, wax crayon marks on walls and previously unpainted knot holes will bleed through most water based paints. A special stain blocking sealer should first be applied sparingly on the knots, stains or marks before applying the paint. For these special situations you may need to use shellac, alkyd or a polyvinyl acetate primer.
These products have an odour and therefore should be used only on the affected areas. When using these products ventilate well, preferably by running a fan. Place the fan in an open window and have the fan facing out.
Severely damaged walls
If walls are badly damaged, it may be quicker and cheaper to install an additional layer of new drywall.
Peeling paint
Peeling is usually a result of moisture under the paint, or of using the wrong type of paint. If moisture is the cause, it must first be corrected, then the surface can be scraped and sanded before painting.
Covering mold and water stains
Mold which appears as dark spots on the painted surface must be washed with soap and water, rinsed and dried before repainting. The cause of the moisture which resulted in mold, if not corrected, will allow the mold to come back.
Painting tips
- Do not excessively thin paints as this decreases their wear resistance and washability.
- If you use solvents of any kind, store the used solvents in an old paint container with a seal and take them to the toxic waste centre in your community. Do not pour solvents down the drain.
- Always paint with a window open and when the temperature is above 10°C (50°F).
- You can remove solvent based paint from your skin by using vegetable oil.
- Smooth evenly painted walls are more readily achievable if you:
- Sand really well after patching.
- Use a roller which you have taken a lint brush to, before using.
- Use a roller designated for the type of paint you are using.
- Clean the surface to be painted thoroughly after sanding.

by admin | Dec 21, 2011 | Blog, Energy Saving, Home Maintenance, Home Repair, Mold, Saftey
Attic Venting, Attic Moisture and Ice Dams
From CMHC Compliments of www.cameronpaine.com
It is rare for Canadians to visit their attics. For many years building codes have required high levels of attic insulation, making attics less-than-hospitable places. People usually go into their attics for one of two reasons: animal intruders, such as bats or squirrels, or water leaking through the top floor ceiling. This guide deals with water entry, such as roof leaks, ice dams, and attic condensation. Consult your local pest control expert to rid the attic of creatures.
What to Do If Water Comes Through Your Ceiling
Find out where the leak is in your ceiling by measuring its location from the nearest outside walls. Then, go into the attic through the attic hatch. It is often hidden in the ceiling of a closet or in the wall of an attached garage. If it is in a closet, move the clothes out of the closet so loose insulation won’t stick to them. Take a good flashlight and a tape measure.
When walking in the attic in older houses, step only on the wooden joists that cover the floor. The joists are usually spaced every 16 inches. They are often hidden under a pile of insulation. If you step off the joists, you will probably put your foot through the plaster or drywall ceiling below. Many houses, especially in warmer climates, have some type of floorboard over the joists. This makes walking easier but can make air sealing and insulating more complicated.

Figure 1: Typical attic floor insulations
Most houses built since the 1970s do not have attic rafters and joists, but trusses – usually at 24 inch centres – with the ceiling below attached to the lower chords. Walking in trussed attics is trickier than walking in older attics.
If you find vermiculite insulation in your attic, do not disturb it. Loose-fill vermiculite insulation may contain small amounts of asbestos, and you should consult a professional if it is going to be disturbed. CMHC’s information piece Asbestos provides additional guidance.
One further caution: if you find a significant amount of animal droppings from bats or birds, do not disturb them. They can grow molds that can cause several illnesses. To clean up droppings, you need good respiratory protection (masks) and clothing that can be bleached or discarded.
Find the water leak. Use the tape measure to roughly locate where the water is dripping through the ceiling below. Lift the insulation in this area to find the pooling water. Sometimes the water runs along the attic floor for quite a distance before coming through the ceiling.
Trace the water to its source. Look for leaks in the roof, especially around chimneys, plumbing vents, and attic vents – anything that penetrates the roof sheathing. Quite often the roof flashing is defective and needs replacement. If the sheathing (either boards, plywood, or composite board) along the lower edge of the roof is soaked and you can see a corresponding accumulation of ice on top of the roof, ice damming is occurring. This means that water is backing up under the shingles. Shingles are designed only to shed water running down, not up. Ice damming is covered at the end of this guide.
Your inspection may find that leakage is not the problem: the whole attic or part of it may be dripping with condensation or covered with frost.
Attic condensation and ice damming are related. Both can be caused by warm, moist air leaving the house and entering the attic. Attics will be in good shape if there are no holes, air leaks, or bypasses from the house to the attic and there is sufficient insulation to keep house heat from escaping. If you can ensure good air sealing and insulation, the attic will remain cool and dry, as if it were outside. For example, it is rare to see moisture problems or ice damming on the roof of a detached garage or unheated barn.
What To Do About a Wet Attic
There are many signs that an attic is wet. Prolonged wetness will rot out the roof sheathing. Often this is first noticed when re-shingling. If you have ceiling leaks only in the spring, it may be that ice has been forming on the sheathing all winter and it suddenly melts when a warm spell arrives. You may see water stains or evidence of mold on the sheathing, rafters, or trusses when you are inspecting the attic. You may find the insulation has been packed down or stained by water or ice. The smell of a moldy attic will enter the house under certain weather conditions, usually in summer.
The usual response is to increase attic ventilation. This is the wrong approach. In some cases, adding ventilation will actually pull more moist house air up into the attic and make the problem worse. The best way to fix a wet attic is to stop air movement, or leaks, from the house. Once this is done, the existing ventilation is usually more than enough to keep the attic dry.
It is important to stop air leaks because a heated house is much like a chimney. Both a house and chimney are containers of warm air surrounded by cold air. Both tend to draw air in at the bottom and expel it at the top. All winter, a heated house is trying to push air through the top floor ceiling into the attic. Block up those air leaks and keep the warmth in the house to save both energy costs and damage to your attic.
Air leaks are usually found at penetrations or discontinuities. Safety regulations prevent sealing of many types of pot lights in top floor ceilings. House air is dumped into the attic through them. Choose sealed pot lights or avoid them on the top floor.
Bathroom fans need to be ducted outside. Make sure that they are properly vented. If the ducts are located in the attic, ensure that they are solid metal rather than flex duct, insulated and sloped to the outside. Do not wrap the insulation in plastic as this will trap moisture.Taping the duct joints, or sealing them with mastic, is helpful for controlling leakage.
Plumbing stacks and chimneys are often sources of air leakage. Seal these where they pass through the attic floor. For metal chimneys inside a chase or for old masonry chimneys, you may need help from an expert to ensure proper sealing and avoidance of fire hazards. Seal holes made for electrical wiring and cable installations.
There will be little air leakage in the middle of sheet of drywall or in the middle of an unbroken plaster ceiling.There may be many air leaks where partition or bearing walls meet the ceiling or around the perimeter of the house where the attic floor (or top floor ceiling) meets the outside walls.
All discontinuities should be inspected and sealed if necessary. Look for bypasses.They are major air passages from any floor into the attic. Dropped ceilings in the room below will often conceal a direct connection to the attic. Concrete block party walls between row houses often move house air into the attic.
There are several ways to check for these large and unexpected leaks. The blower door tester can pressurize the house with a big fan and amplify the leakage. Searching the attic at night for lights from below can be helpful. Scanning batt insulation for dirty areas which have been filtering the air from below is also useful, although such straining seems to occur less frequently with blown insulation. Sometimes the holes are so big that you can see into the house below.
Some houses have heating or air conditioning ducts or equipment in the attic.These can be the major source of air leakage and heat loss in the attic. Good information on how to seal and insulate these devices has been published in Home Energy Magazine, available in some libraries.
Leaks can be sealed with caulking, expanding foam, plastic, or other methods. There are a number of publications giving details on sealing methods, including “Keeping the Heat In” from Natural Resources Canada, 1-800-387-2000 in Canada or (613) 995-2943 outside Canada. An electronic version is available on the web at: http://www.oee.nrcan.gc.ca/keep_heat_in/
In an older house, the most thorough way to air seal an attic floor is to clear away insulation from each joist bay and seal all discontinuities. If the attic joists are covered with floor boards, a thorough job includes lifting them to expose the ceiling below. Do this for the entire attic except for areas underlain by unbroken ceilings in a large room. It sounds difficult, but for most attics it should not take more than a day for a two-person crew. Wear good dust masks. Do the work in the fall when the attic is not too hot. Doing only obvious discontinuities without lifting all the insulation can be effective but may result in missing some air leakage paths.
While you are up there, why not put some more insulation down? Make sure that you have at least 300 mm (10 in.) of loose insulation or batts.There are only minor differences in the insulating quality of fiberglass, rock wool and cellulose.They all work well in attics.
Where to look for leaks
- around plumbing stacks or plumbing walls
- chimneys through the attic
- any light fixtures from the ceiling below
- electric wiring
- ducting for fans or heating systems
- perimeter walls
- partition walls
- party walls
- above pocket doors
- above lowered ceilings
- where the side of a cathedral ceiling meets an open attic
- split level discontinuities
- where additions meet an older section of the house
- above rounded corners or staircases
- balloon frame walls
 Figure 2: Leakage areas on split level houses
Attic Venting
If you have properly sealed the attic you should not need more attic ventilation. Attic ventilation is overrated. In winter, the cold outside air cannot hold much humidity or carry moisture away from the attic. In summer, attic temperatures are more affected by the sun and shingle colour than by the amount of ventilation.
Recent research shows that identical attics, with one unvented and the other vented to code, have much the same humidity and temperature. Attic computer models show that attics in damp coastal climates may actually be drier with less ventilation.
Building codes require attic ventilation. Ventilation may make a difference in a borderline situation. Attic ventilation is driven primarily by wind. To ensure thorough venting, have openings at the soffits and then higher on the roof at the ridge, gable end, or high on the roof surface. The requirement for attic vent sizing is nominally 1:300 (or one square foot of vent size for every 300 square feet of attic floor area). If you wish to improve your attic venting, ensure that it is as well distributed as possible. Do not worry about meeting the 1:300 requirement exactly. Vents should be screened to keep out animals and insects. If you are using soffit vents, make sure that there is a space between the roof sheathing and the insulation for the ventilation air to pass. Commercially available plastic or card board forms can be used, or the extruded polystyrene board option described in the Ice Damming section.
 Figure 3: Insulating the outside edge of the attic fl
oor
Ice Damming
Ice dams are the large mass of ice that collects on the lower edge of the roof or in the gutters. As more melting snow (or rain) runs down the roof, it meets this mass of ice and backs up, sometimes under the shingles and into the attic or the house.
Ice damming usually occurs with a significant depth of snow on the roof. If the attic temperature is above freezing, it warms the roof sheathing which melts the snow lying on the shingles. This water runs down the roof until it meets the roof overhang, which is not warmed by the attic and will be at the temperature of the surrounding air. If the air and the overhang are below freezing, then the water will freeze on the roof surface and start the ice dam.

Figure 4: Formation of an ice dam
An attic with no insulation will generally not have a problem with ice dams. The heat coming through the attic will tend to melt snow off as it lands and prevent much accumulation. A well-sealed and insulated attic will generally not have ice dams. Like the example of a detached garage, this generally results in a cool roof and no great amount of melting. Ice dams are more frequent if the roof is complicated by many valleys and dormers or there is a large roof overhang.
Ice dams will first show up where there is inadequate insulation or major air leaks. One way to find these locations is to look at the roof with the first heavy frost in fall or light snow. Watch where the snow melts off first and find out what is under that spot on the roof. One common sight in such conditions is a horizontal melt line across the roof of a storey-and-a-half house, where the short kneewall meets the ceiling. Other places would be beneath a roof-ducted exhaust fan or over a leaky attic access hatch. The basic relief for ice damming is to seal all attic air leaks and insulate thoroughly, the same solution as for attic condensation.
Many attics, including those under low-sloped roofs, do not have enough space for adequate insulation at the edge of the attic floor. If soffit insulation requires a baffle to keep a ventilation opening against the sheathing, often there will be only 100 mm (4 inches) of space for insulation. This will tend to melt the snow off just above the over hang and promote ice damming. Try to put the best insulation possible at that edge to reduce heat loss. Blown foam is ideal as it air seals as well as insulates.
Cut pieces of extruded polystyrene will help as well. Mount a piece of extruded polystyrene 25 mm (1 inch) from the sheathing to maintain the ventilation air space and fill between this board and the attic floor with good insulation.
Ice dams caused by cathedral ceilings are more difficult. The same principles apply to preventing ice dams — stopping house air leaks, good insulation, perhaps ventilation — but cathedral ceilings are harder to get to. If you have ice dam problems with cathedral ceilings, you can fix the problem when re-roofing. Remove the sheathing, seal and fill the cavities with insulation, and replace the roofing material. A well-sealed roof will not need ventilation. If you are uncertain whether the sealing can be done effectively, leave a ventilation channel under the sheathing from the soffit to the peak. Sometimes insulation can be added to the ceiling inside, although this approach will not catch the air leakage.
An extensive and expensive ice dam solution is to make the roof impermeable by using a self-sealing membrane under the shingles. Building codes require such membranes on the lower part of the roof in new houses. Note that these membranes do not stop ice dams, they just prevent the water from leaking through the roof sheathing. Ice damming can still create the unsightly ice build-up and possible damage to shingles and gutters, but you may be spared the leakage into the house.
Do all these ice damming solutions sound like too much work? There are many quicker solutions that are popular, but in the end have drawbacks. You can attach electric cables which will melt channels in the ice, sometimes alleviating a problem. Cables use a significant amount of electrical energy as well as being an eyesore on most roofs.
Removing gutters will keep them from becoming ice traps, but gutters are valuable: they keep roof water away from your basement. Attacking ice dams every winter with an axe or ice pick is a good way to shorten shingle life — and a good opportunity to fall off a ladder. At least one person has had success with filling nylon stockings with salt and laying them in the gutter. Some corrosion and environmental damage may result.
For some older houses with complicated roofs, it may be impossible to completely eliminate ice dams without resorting to some of the methods above. However, for most houses, the preferred solution is to keep house heat out of the attic, by air sealing and insulating, and avoid weaker alternatives. Spend the time to fix it properly and you will not have to worry about it again while you live in that house.
Additional Resources
Developed by Natural Resources Canada (NRCan), the ecoENERGY initiative provides a residential energy assessment service delivered by local organizations across Canada for a fee. Retrofits may be eligible for grants. To find a local service organization or grant information, visit http://www.ecoaction.gc.ca or call 1-800-387-2000.
